The Praxic Temple is under siege by Bael's newly formed Dredgen and Imperium. Destiny 2: Renegade To end their power. Destiny 2's Equilibrium Dungeon is a lot of fun, but it can be a bit confusing and overwhelming for first-time players.
Below we will go through all the encounters. Destiny 2's Equilibrium Dungeon lets you know what mechanics to expect and how to master them. It also provides insight into the jumping sections, ensuring you can complete them quickly with no getting lost and minimal deaths for you and your fireteam.

Destiny 2 Equilibrium Dungeon Loot Table
Find out what weapons and armor you can get in Destiny 2's Equilibrium Dungeon, and which encounters you can get them from.
equilibrium open encounter
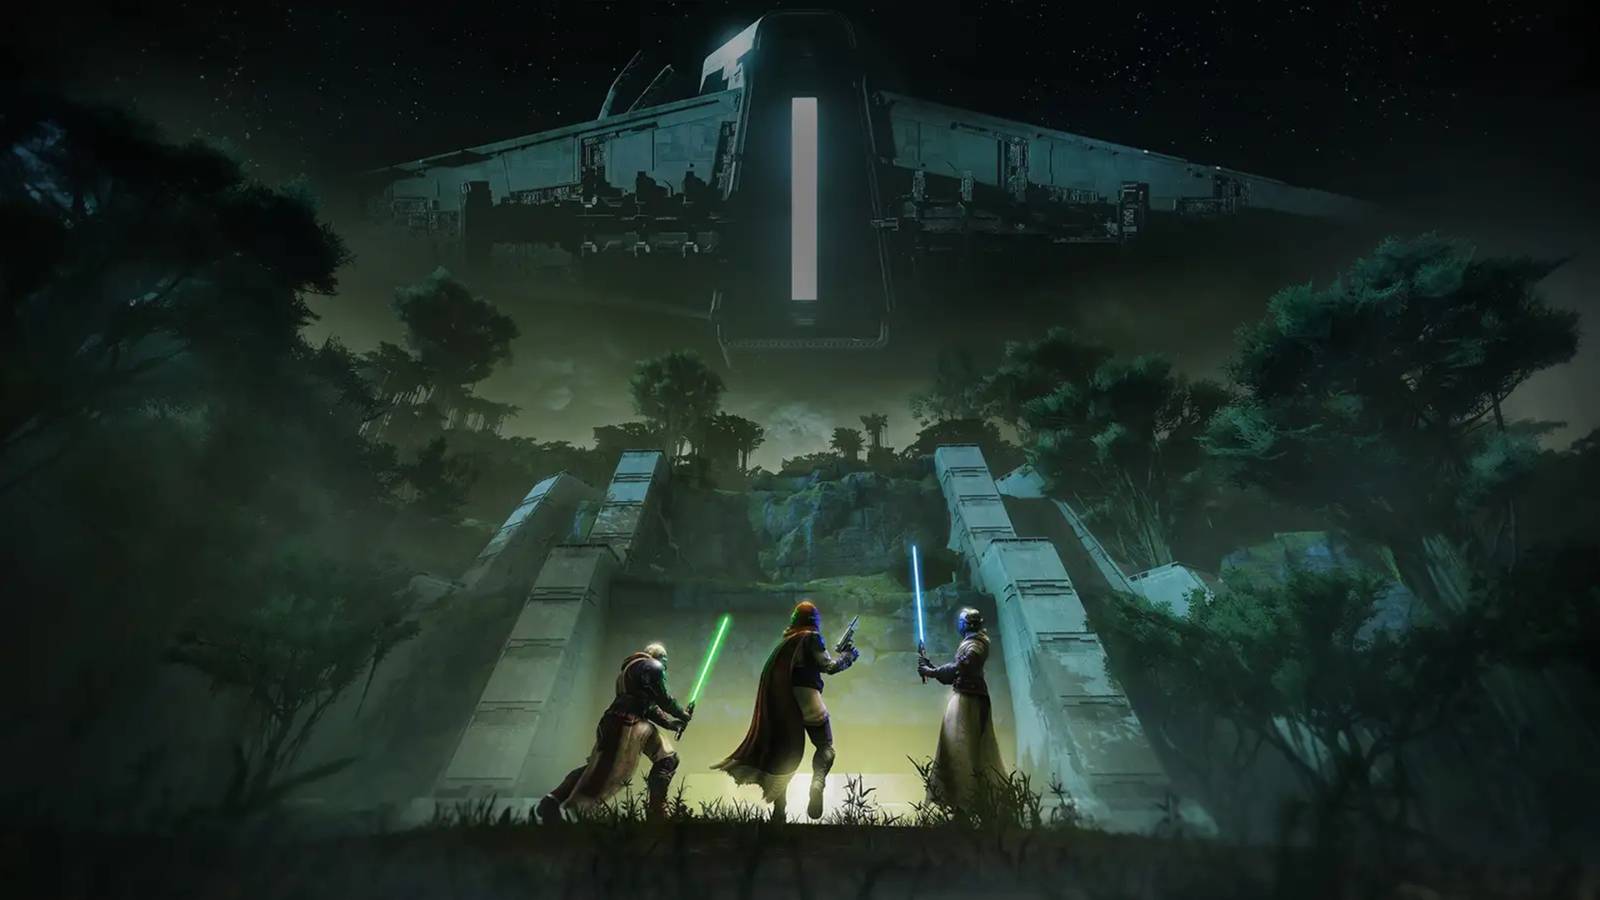
You can start the Equilibrium Dungeon in the Lawless Frontier section of The Portal on Venus. Once you've landed your ship, it's time to make your way through the temple grounds and defeat the Cabal that's staying here. Now push forward and drop down near the waterfall and you will continue the linear path to find the Praxic Temple with a rally banner and the start of your first encounter.
Equilibrium Encounter #1 – Harvester
You can begin your first encounter by interacting with the Harvester ship just outside the Praxic Temple in the center of the arena. Meetings follow two core principles: By building Gathering Shadows, you can become a Shadow Novice and break the Nameless Apprentice shield.and Defeat the Behemoth that spawns after defeating it..
To get the Gathering Shadows buff first, you'll need to interact with one of the antennas around the room near where the red shield wall is. Interacting with the array satellite will reveal its battery, but destroying it requires calling in a nameless apprentice to stand nearby and detonate it. This is achieved by simply standing close by.
Afterwards, you can enter the once protected room and find Sparrow, who is much faster than you and has a gun. Use your sparrow to race around open spaces to collect Gathering Shadows, pools of light on the ground. Once you fill the meter, you will receive the Shadow Novice buff for 45 seconds, which can be refreshed with a larger pool of Gathering Shadows.
The Shadow Novice ability allows you to switch between the grenade ability and the new Shadow Power. You can now use Shadow Power Grenades to shatter shields when the Nameless Apprentice explodes, and kill them to summon a Behemoth. There are 6 Nameless Apprentices and 6 Behemoths that are created. Defeat them all and the first encounter is complete! Now all that's left to do is interact with the Harvester ship to proceed.
Equilibrium Traversal Puzzle #1
After boarding the Harvester, you will respawn inside a large Imperial ship. Immediately look up and start jumping onto the platforms and you will find a vent that you can shoot to get inside. Continue the linear path forward and you'll eventually shoot the three blue batteries next to the locked door and reach the locked door on the other side.
The ship now activates its NLS drive to move faster, so you'll have to stand on the far left and jump to the next platform, as the speed of the NLS drive will push it to the right. Once you land, you need to go left and destroy the blue fuse in the room.
There is a secret chest in the central room, which can be found by jumping up the platform in the center and ducking into the crawl space.
Now move forward to destroy the next blue fuse to open the locked door. To the right of the next room is a vent that leads to the second encounter. This vent will be the first boss you face.
Equilibrium Encounter #2 — Dredgen Disciple Harrow
After using the rally banner, turn around and look for a blue fuse in the locked door. Shooting this fuse will open a trap door in the floor allowing you to meet the boss one-on-one. Harrow will greet you with dual-wielding Praxic Blades and an immunity shield, so you'll want to avoid him for now and enter one of the doors that opens when the armored forces break through.
First you have to go inside. Kill Psion Lakeys for the Gathering Shadow Buff. Each room also contains a Centurion Lackey, which provides the Gathering Shadow buff. Get enough to become a Shadow Apprentice. Use this buff to enter the three large exterior rooms where you kill the Centurion Lackeys. Each room has three batteries mounted on the walls..
You'll need to use the Shadow Power ability to shoot the battery to make the panel close. You'll know the room is complete because there will be three green lights above the door. Repeat this in each room and you should see something like this in the bottom left corner of the screen: “Activate emergency subsystem”This means you can use Harrow to re-enter the middle room.
At Harrow's stadium you can: Start lowering Harrow's shield by shooting the blue fuse on the wall, which causes the hatch to drop to the floor.Harrow can be baited to take a third of his shield. This can be repeated twice, then use the Shadow Apprentice buff to shoot the battery at the wall and You can attack Harrow by activating the large blue generators around the room. Knock down the last part of his shield and begin the damage phase.
Alternatively, you can use Shadow Power to push Harrow into the generator as he leaps back. During the damage phase, the Harrow can attack this generator to extend it.
Repeat these steps until Harrow is on his last stand health bar, after which he will begin to retreat through the ship. You have to chase him, but be careful there are turrets and armored units inside. Harrow can be killed if you enter the last room, but if you don't, he will regain his shield, which can be eliminated by firing the blue fuse in the room to drop a hatch that Harrow can fall through. When a Harrow dies, a chest will spawn for loot!
Equilibrium Traversal Puzzle #2
Once Harrow is defeated, head to the center of the room to find a lever you can activate. This will open a bay door where you can stand, from which you can escape lightspeed and jump to the ship you land on the left. Get on the ship and follow the path to the left to find two red lights with switches on them, once activated you can enter the ship.
Continue along the path until you reach a large shipping hangar, and you'll want to access the vent spaces. Inside, you must destroy the Cabal and Behemoth and interact with the console to activate the moving platforms. From here, look up to find the path forward from the central hatch.
Continue exploring and when you find the tank, drop down the raised platform to find four vents, each with a path. Only one of these is the way forward. Anything else just leads to a dead end.
The final area takes you to a large room where you need to collect the Gathering Shadow again. Climb up the platform in the room and use the Shadow Power Grenade on the other acquisition panel to open a hatch in the red pipe that allows you to access the final encounter.
Equilibrium Encounter #3 — Dredgen Sere
Dredgen Sere is the final boss of the Equilibrium Dungeon, and the battle begins when you approach him. However, he performs powerful attacks that can hurt or even kill you, so it's better to shoot him from a distance.
Dredgen Sere will sometimes target players, so keep an eye out for the pink text that says “Face Death!” Sere shoots lightning from his hands and won't stop until you're dead. You can counter Cere's lightning attack by shooting her hand to stun her..
The mechanics of Dredgen Sere are simple. Defeat Centurions to build the Gathering Shadow and become the Shadow Master. Then use the Shadow Power grenades to disable the Nameless Apprentices' immunity shields and kill them. There are a total of 5, and each time you die Captured spheres lose the central slab's immunity shield. Destroying the sphere will give you more time before the “Seduction of Darkness” buff activates.This sends you to the Ascension Realm.
Once you enter the realm of Ascension, you must: Find and kill 5 Blistered Shadow enemies around the arena.. These can be killed without the Shadow Gathering ability, but can be forced by interacting with them using the Shadow Master ability. This will allow you to defeat them and destroy the Taken orbs in the general area.
The fifth Blistered Shadow is located on top of the structure and can be found by climbing the Taken platform leading upwards. The platform only spawns after four other Blistered Shadows are dead.. With each death, destroy the Taken Plague on the central pillar to spend more time in the Ascension Realm.
Once all Taken orbs are destroyed in both areas, the DPS phase begins. Against Dredgen Sere. Sere also summons lightning from pylons around the arena, which can be disabled by shooting panels around the map with Shadow Power. Once you have enough DPS levels, Sere will die and you will receive the final chest.

- released
-
August 28, 2017
- ESRB
-
T For TEEN against blood, language and violence
