The Riddler isn’t the only trickster in Gotham City; Cluemaster has also infiltrated parts of the city with his strange and tricky puzzles. Batman and his companions must solve each one to prove their skills in Lego Batman: Legacy Of The Dark Knight.
Use every character you have to figure out the tricks and clues to the Cluemaster’s contraptions. Some of these puzzle boxes are difficult to figure out, so we have everything here to help you solve each Cluemaster puzzle box in Gotham and claim your rewards.
How To Solve Every Cluemaster Puzzle

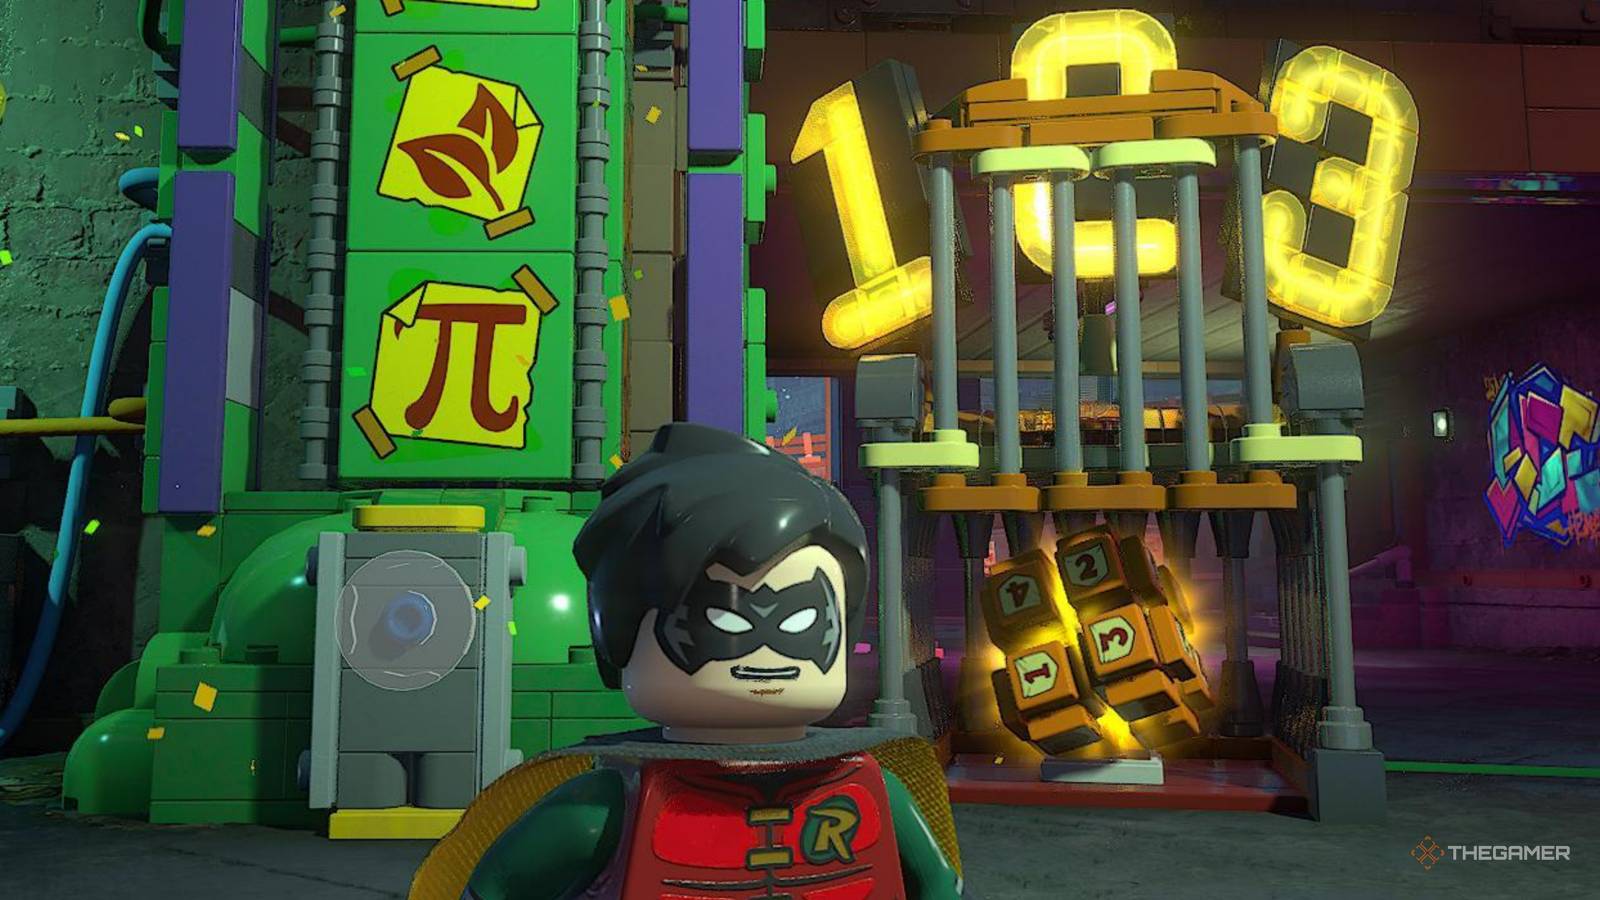
The Cluemaster challenges are just like the Riddler puzzles, except they have his telltale 1,2,3 signage around. The first time you come across these puzzles is during a Robin mission, The Dynamic Duo. After completing some AR challenges, you stumble upon what looks like a Riddler puzzle until you look closer and see it is actually from the Cluemaster.
The pillar has three symbols, each controlled by a different switch. The third symbol for this puzzle is on the wall to the left. Use Robin’s tool to move the symbol until it matches the wall (pi). Behind you is something hanging from the pillar.
Hit it to get it down, and pick up the handle. Place the handle in the cog on the pillar next to it, and change it to the leaves symbol. Next, use Robin’s gadget to attach the dumpster to a point on the ceiling, then move the slider with his tool, so the symbol is a globe. Pick up the clue inside the cage, along with your reward.

Get Batgirl to hack each Tower and unlock every Cluemaster map icon to find them all easily.
After completing the first Cluemaster Challenge Room, you unlock the rest of the Cluemaster Puzzle Boxes. Find them all around the Gotham districts.
Tricorner Cluemaster Puzzles
|
Cluemaster Puzzle Location |
Guide |
|---|---|

|
Requires Talia. Use Ninja Dash to go inside the cage and grab the keycard. Use the keycard to open the cage. |

|
Requires Batgirl. Hack the gate to open it. Go up on the roof to grab the large battery and put it in the space inside the cage. |

|
Requires Nightwing. Pry open the shipping container on one side, then open it on the other. Get Batman to pull open the door in the middle. Attach a cable through the shipping container. |

|
Requires Nightwing. Slide open the panel. Press each button until they are all green. |

|
Requires Catwoman and Jim Gordon. Turn the wheel. Use the whip to unscrew the lower part of the container. |
Old Gotham South Cluemaster Puzzles
|
Cluemaster Puzzle Location |
Guide |
|---|---|

|
Press the buttons and watch for when the white light appears above one symbol. That indicates the correct symbol was selected. The symbols are: cup, heart, house, triangle. |

|
Hit the targets so that the power goes from 1 to 1, 2 to 2, and 3 to 3. Follow the cables from left to right. |

|
Pull the lever. Follow the cables to find the corresponding symbols- atom, paintbrush, globe in that order. |

|
Break the boxes behind, take the handle. Use the handles to change the numbers to 314, and press the button. |
Old Gotham North Cluemaster Puzzles
|
Cluemaster Puzzle Location |
Guide |
|---|---|

|
Requires Batgirl. Speak to the citizen. Use the Drone to fly in and scan to get the code. Enter the code. Speak to the citizen, take the battery and insert it into the slot by the cage. Use the other one from the door to power the cage. |

|
Follow the yellow paint splodges to find each lever. Pull them to power the puzzle box. Hit targets along the way to power up the cables. |

|
Use UV Vision to follow the splodges and find the numbers 3 in yellow and 45 in blue. Turn the wheels so that the yellow hand points at 3 and the blue hand points at 45. Step on the button. |

|
Use X-Ray Vision to find where the key is. Go to the building opposite and turn the wheel so the steam moves to the next pipe. Keep moving the steam to the next pipe until the key pops out. |

|
Requires Talia. Ninja Dash inside the cage, take the key. Open the cage from the outside. Take the battery from the slot at the end of the building. Place it inside the cage slot. Pull the lever. |
Old Gotham West Cluemaster Puzzles
|
Cluemaster Puzzle Location |
Guide |
|---|---|

|
Hit only the targets that are lit up. |

|
Take the battery from the slot by the puzzle cube. Go across the street to the part and put the battery in the slot there. Hit 6 targets as they appear. |

|
Requires Talia. Ninja Dash inside the cage, smash and rebuild a block. Push it onto the scale. Stand on the other two buttons. |
The Cauldron South Cluemaster Puzzles
|
Cluemaster Puzzle Location |
Guide |
|---|---|

|
Put weights on that add up to 200 = 15 + 15 + 30 + 50 + 90 |

|
Requires Nightwing. Break all the boxes. Take the battery from nearby and place in the slot. Use the wheel to twist the image and the slider to increase the size. |

|
Requires Jim Gordon. Stop the ads when they make the light go on. Break the foam above the yellow ad, and pull the panel from the right side ad. Stop the ads with foam when they light up. |

|
Requires Nightwing. Break the chimneys and rebuild. Turn it so you can connect the cables to the cage and to the other power box. Charge the other power box. |

|
Smash and rebuild the center box. Pull the lever. Step on buttons to open the doors. Match the images behind the doors. |
The Cauldron North Cluemaster Puzzles
|
Cluemaster Puzzle Location |
Guide |
|---|---|

|
Requires Nightwing. Talk to the girl outside. Use a vehicle to pull the door open. Pull the box off the wall and rebuild. Shoot the box down on the left and rebuild. Lower the platform and stay there. Batman can drive a vehicle onto the platform. Stand on the other buttons, and Nightwing can hit all three switches left to right to power the cage. |

|
Requires Catwoman and Nightwing. Open the hatches to see the numbers: 11:05 and change the clock hands to match. |

|
Move the carriages to the right rails, using the levers to move the direction of the rail. |

|
Change the symbols to Atom, Paintbrush, Pi. |

|
Requires Nightwing. Break the boxes and rebuild. Connect the clock and the power with a cable, and charge. Hit the cable so it breaks when the clock hits 6, 7, or 8. |

|
Requires Jim Gordon. Go to the machine on the dock to the right. Pull off the panel and pull the lever. Shoot foam on the gears when the light goes green. |
Gotham Village Robinson Park Cluemaster Puzzles
|
Cluemaster Puzzle Location |
Guide |
|---|---|

|
Pull the lever. Find the various targets nearby, but only hit the Pi, Book, and Star/Moon icons. |

|
Break the boxes, turn the wheel so the image lines up. Step on the button until it is the right size. |

|
Grapple to the very top of the building, break the box and rebuild. Jump down through the sections to the target below. |

|
Pull the lever and then only step on the buttons that light up. |

|
Requires Nightwing. Land on the dock and pull the panel from the machine. Push a machine nearer and connect it with cables. Cross the water to get the box. |
Newtown Cluemaster Puzzles
|
Cluemaster Puzzle Location |
Guide |
|---|---|

|
Requires Nightwing. Break the boxes and get the battery. Put all batteries in the slots. Connect the power with cables. HIt the targets, so the power lines will connect. |

|
Press the buttons until the symbols show: house, cup, triangle, house. |

|
Pull off the front of the projector. Turn the wheel to line up the shapes and press the button to make it bigger. |

|
Use the spotlights to fill in the jigsaw images; change the lenses to match the shapes. |

|
Hit the targets to direct the water through the pipes. You will have to close and open pipes to get each number to light up. |

|
Break the satellite dish and pick up a pipe. Use it as a lever in the platform. Watch the smoke stacks and follow the pattern with the buttons, |

|
Requires Jim Gordon. Look at the pattern on the wall around the corner. Use foam to stop the cogs, so the pattern matches. Break the foam with his other gun if you make a mistake. |

|
Use the handle to turn the wheel section until the light switches on, press the button to get to the next section. |

|
Requires Nightwing. Connect the ball, so it hangs from the top. Pull it open with your vehicle. |

|
Requires Batgirl. Use the Drone to scan the image on the wall. Enter the code by the elevator and go up to reach the puzzle cage. Hack the button to the left. |
East End Amusement Mile Cluemaster Puzzles
|
Cluemaster Puzzle Location |
Guide |
|---|---|

|
Go across the street and drive a vehicle onto the platform. Grapple up and glide through to the puzzle box. |

|
Pull the panel off the wall, hack the button. |

|
Requires Jim Gordon. Use the foam to stop the cogs so the hands match the clock in the center. |

|
Answer the phone, then destroy it. Use a vehicle to pull the car away. Build two buttons. Press the buttons until the symbols show: house, cup, cup, heart. |

|
Grapple to the building across the way. Use the spotlight to create a path of arrows from the bottom left button to the puzzle cage. Glide down and press the buttons in that order. |

|
Break small boxes across from the crane and get the battery. Put the battery in the crane. Pull the lever. Break boxes to the right to find a small cog. Put it in the crane. |

|
Requires Nightwing and Batgirl. Follow the cable around and charge the power point. Hit the targets until the power flows through the line. Hack the button. |

|
Requires Jim Gordon. Shoot foam to plug the hole. Use the buttons to stop the icons so the lights turn on: heart, triangle, house, heart. |

|
Requires Nightwing. Use UV Vision to track the electric connections in each box. Have Nightwing stand on the button to connect the cables. |
Lego Batman: Legacy Of The Dark Knight – Complete WayneTech Cache Guide
Open up for some huge rewards in Lego Batman: Legacy Of The Dark Knight
